

ELEGOO Smart Robot Car Kit Compatible with Arduino IDE with UNO R3 Board, Robot Toys for Kids age 8+, Educational Science kits Programming for Boys Girls Adults
Original price was: £75.99.£65.99Current price is: £65.99.


Price: £75.99 - £65.99
(as of Jun 03, 2025 15:10:11 UTC – Details)
From the brand


ELEGOO STEM kits provide all the necessary components, sensors, wires, and boards for you to get started with programming, learning electronics, and creating IoT projects.
We strive our best to make STEM education easy to learn and accessible to the young generation.
New Release
DIY Robotic Car Kits
Starter Kits
Controller Boards
Accessories that will be used
How did we get started?
Chris, the founder of ELEGOO, found out that most enterprises in the STEM industry focused on open-source electronics hardware and did not have the tools to create a complete product by combining electronic hardware and structural shells.
What makes our products unique?
We have excellent R&D teams, constantly upgrading and improving products, and after-sales service teams for quick support
What product are we creating?
100% compatible with Arduino, ELEGOO’s kits are best-practice for beginners with no appropriate technical tools to learn about electronics.
ELEGOO Smart Robot Toy: An educational STEM kit beginners to get hands-on experience about programming, electronics assembling and robotics knowledge. It is an integration solution for robotics learning and made for education.
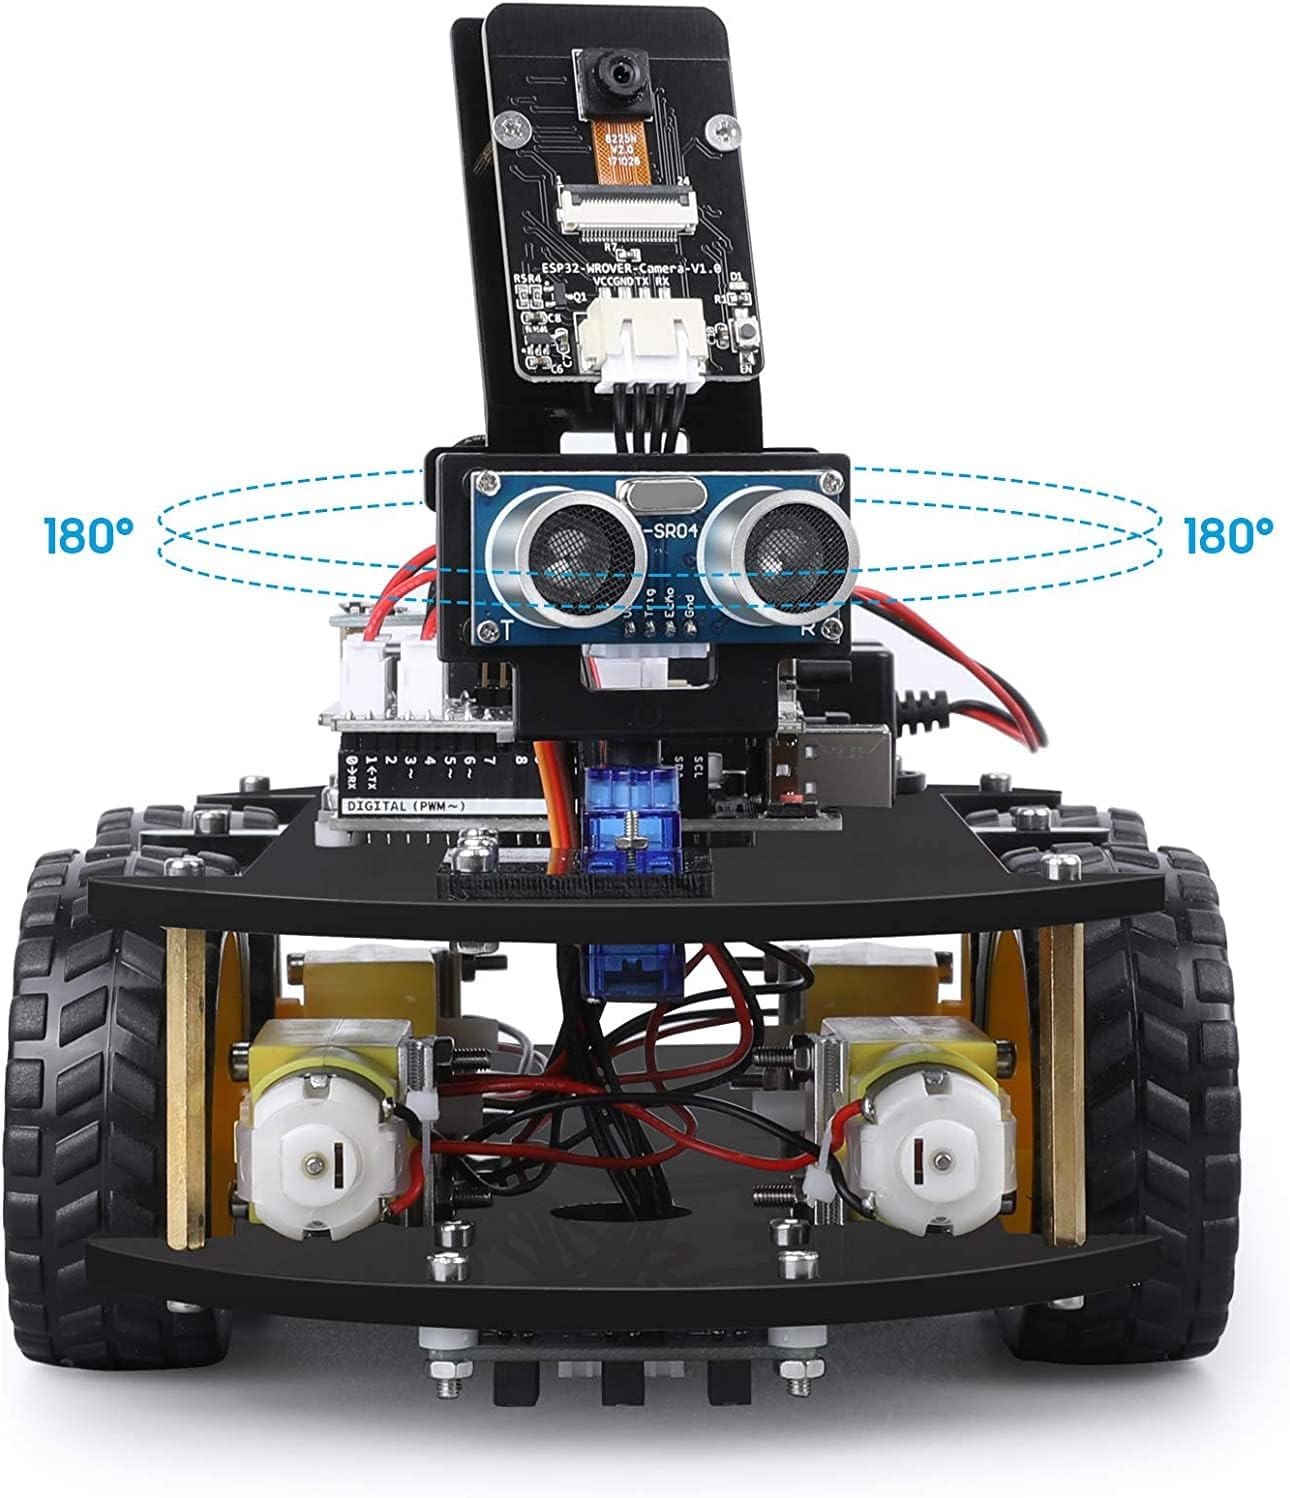
Remote & App-Controlled Robot: Our robot features an infrared remote control control via WiFi, allowing you to operate it easily using an app or a remote controller. Experience immersive control with the toy robot’s built-in camera for FPV (First-Person View).
Easy to Assemble: All the module interface has been modified with XH2. 54 ports as to make this robot kit much easier and convenient to assemble the car and reduce the chances for errors.
Refined Tutorial: HD rendering instructions on how to assemble the robot car from scratch and all the necessary programs and codes are included.
Complete Package: This toy robot car contains 24 kinds of module parts including obstacle avoidance, line tracing module, so you can enjoy the function like tracking mode, obstacle avoidance mode, and automatic following mode.
Upgraded Package Design: More minimalism design and make it a perfect gift for your kids and friends. Note:(Applicable Age : 8+)To use Elegoo starter kits requires basic electronic knowledge. If the user has no experience, it would be better to have someone lead and teach them while studying.
Customers say
Customers find the robot car kit easy to assemble with clear instructions and appreciate its educational value for learning about robotics. Moreover, the kit receives positive feedback for its presentation, build quality, and fun building experience. Additionally, the software quality is good, with customers liking the programming features. However, functionality receives mixed reviews – while some say everything works well, others report issues with the wheels not working properly.
2 reviews for ELEGOO Smart Robot Car Kit Compatible with Arduino IDE with UNO R3 Board, Robot Toys for Kids age 8+, Educational Science kits Programming for Boys Girls Adults
Add a review
Related Products


Original price was: £75.99.£65.99Current price is: £65.99.
Dark Lady –
Arduino Based Smart Car, with a huge range of features 🙂
Teaching Artificial Intelligence at Undergraduate level and seeing many student projects involving Robotic Cars, I was curious what this Kit by Elegoo would be capable of for the money, and whether I could potentially use it for teaching purposes, or for helping my Children (6 and 8 years of Age) understand how these âSMARTâ cars work.So I was excited to get started with the Elegoo ROBOT CAR Kit (SMART) V2.0 when it arrived.Upon receiving the kit, I noticed how well made the box was that the kit came in (as shown in Figure 1). Having bought kit before from other manufactures wrapped in plastic, or just put inside a jiffy bag, it was nice to see this kit securely and safely housed inside a bright orange box.Upon opening the box, I was pleasantly surprised to see a very well packaged kit, with key components such as the all-important Arduino board wrapped in anti-static bags to prevent them getting damaged by electrostatic voltages. Also inside was a nice key to contents in the lid, and a CD ROM ready for me to use as shown in Figure 2.Assembling the CarInserting the CD I opened âLesson 0 Assemble The Carâ and proceeded to build the car.The care took approximately 52 mins for me to build, and at times I had to double check the instructions as at times they were slightly unclear, but still 52 minutes to assemble the car seemed reasonable to me, Iâm comparing this to a Lego Robot I built recently that took me 2+ hrs ï. The completed car can be seen in Figure 3.Making the Car Move Backwards & Forwards**************************I started with the âMake The Car Moveâ tutorial but quickly realised the batteries supplied were flat, Iâm not sure if I was a novice user I would notice that, but the car just wonât work if the batteries are not charged. So best to put these on charge when you first unpack the kit (You cannot use standard batteries). Also though it says in the lesson to unplug the Bluetooth module when uploading a program, it is very easy to forget to do this and as such the program wonât send to the Arduino. So I had to unplug the Bluetooth each time I wanted to upload a program.⢠So I charged the battery.⢠Opened up the Arduino program (Sketch)⢠Ran the sample code⢠Happily, the car quite happily moved backwards and forwards which was good ï⢠I pressed the rest button on the board when I had seen enough ïThe lesson itself is actually very detailed on how the motor driver works and so is definitely worth a read.Making the Car Move Bluetooth**************************I suspect me along with most users are going to find it long winded to get the .apk file from the disc onto the android phone, as such it would have been helpful to have put an app inventor QR code, an app inventor program or simply a google store application up for me to download. As such I skipped this lesson.Making the Car Move Infra-red.**************************For this I needed to unzip the 2 libraries included âArduino-IRremoteâ & âIRremoteâ and put them into the libraries folder of the Arduino software on my PC.After running the software, I realised the car moves quite quickly as such, it would be really helpful if the example code made the car move a lot slower, which is easily possible, but less so for a novice user ïI noticed that unless the remote was pointed exactly at the infrared receiver, I got some random results and nothing seemed to happen, I found this out by opening the Serial port on the PC and watched what was happening.Making the car move obstacle avoidance**********************************I uploaded this to the car and put a bin in front of the robot, nicely it scanned, backed away, but then carried on backwards. I can see what it is trying to do, and Itâs a Robot Kit so Iâm happy to experiment with the software to get this to behave the way I think it should, but It would certainly have put off other users.So My Final Thoughts.******************I have lots of robots from the toy shop that work as I would expect out of the box, and they are fine to experiment with. But this isnât a toy! It was a different proposition for me, I wanted a kit that I could build and learn from, a kit I could experiment with and be able to improve myself over time with code, and I think that is where this kit excels. If I was after something that assembled into a final car that just worked without any coding then this would be something I wouldnât buy, but as an electronics, software, robot buggy development kit I really liked it. With some time and patience, itâs a lovely piece of technology for the adventurous electronics/robotic hobbyist to work with an Arduino based Robot Car. Sure the instructions could be improved on for assembly, the speed could be reduced, and an App could be available on the Android store to make it easier to control, but they are things I can do myself, and do quite easily with a little experimentation. Debugging is easy if users are happy using the Serial Window in the Arduino Sketch, and it would be good to see a tutorial to allow users to work through an example in case the car doesnât work.Overall I would recommend this to a friend, and even get a few more to see if they could work together.The kit is controlled by the Arduino Uno, and this is an excellent embedded board to learn on as it is very versatile.
Shal –
Affordable Kit with most functions
This is really a good kit for the price. I originally bought it for £54 last year. As it was really good I ordered another one for my friend as well. The customer service is excellent with immediate response. When I misplaced one of the connectors they sent a free replacement immediately. It is very difficult to order any replacement parts unless you are an electronics nerd as there are different types of connectors in the market and hence the request to Elegoo.At the time of purchase this kit had the most features for the price. Other kits were selling at nearly twice the price for the same functionalities. The only feature missing is wifi functionality. I think this more to do with the arduino board.The quality of the kit is excellent. Everything works well as stated. The instruction set is quite clear and there is no scope for errors as all the connections are interlocked. Hardware wise the motors for the wheels could have been slightly more powerful.The software is excellent with so much help available in the internet community. There are some bugs in the software but this can be easily identified and rectified. This is really a entry level kit for the introduction to Arduino and robotic control. Young kids may require some help in programming. The robot car will not run with a speed set at 150. Hence a speed of 175 and above is recommended especially for carpets. I had to swap the left right algorithm as it did not work the way it was intended, not sure if I assigned the wrong pins though. The remote control key codes had to be changed and it did not work with the codes provided. All the functions are individual programs. I managed to combine all of them to a one big programme. This was really challenging and all help is available on line. It is to be noted that the infrared remote needs to be correctly pointed to make it work as is the case with all infrared remotes.There are expansion pins available even after final assembly and I think this can be used to expand it further with sensors. I have not tried to expand the functions but I hope this is possible.