

CASEMATIX Hard Case Compatible with Oculus Quest 2 and Oculus Quest VR Gaming Headset & Accessories – Oculus Quest Case Storage with Customizable Foam Also fits Elite Strap and Other Accessories
£80.14


Price: £80.14
(as of Jun 06, 2025 04:40:57 UTC – Details)
CASEMATIX Impact Protection and Organizer Case Compatible with Quest 2, Quest 3, Quest 3S and Accessories – Customizable Foam To Create Compartments to Protect VR Headset and Virtual Reality Controllers
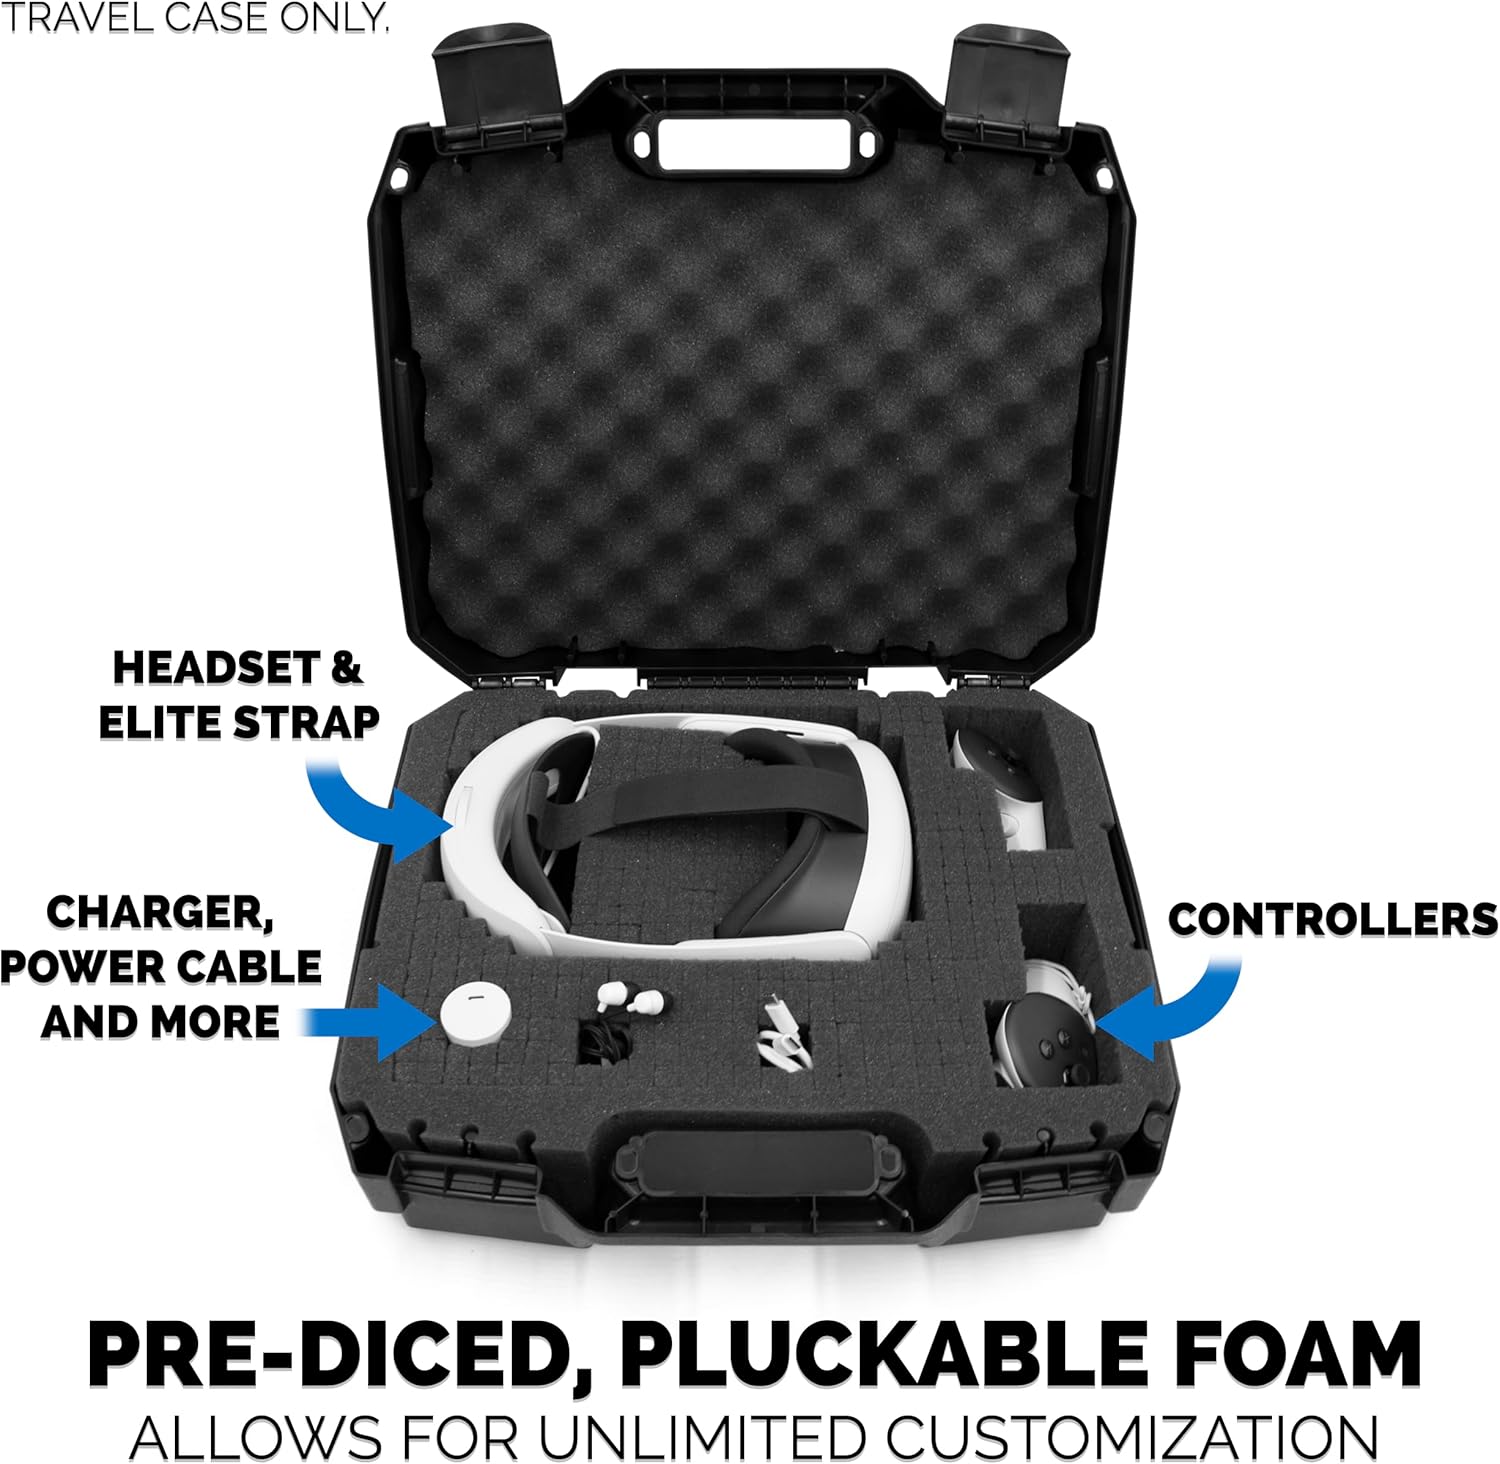
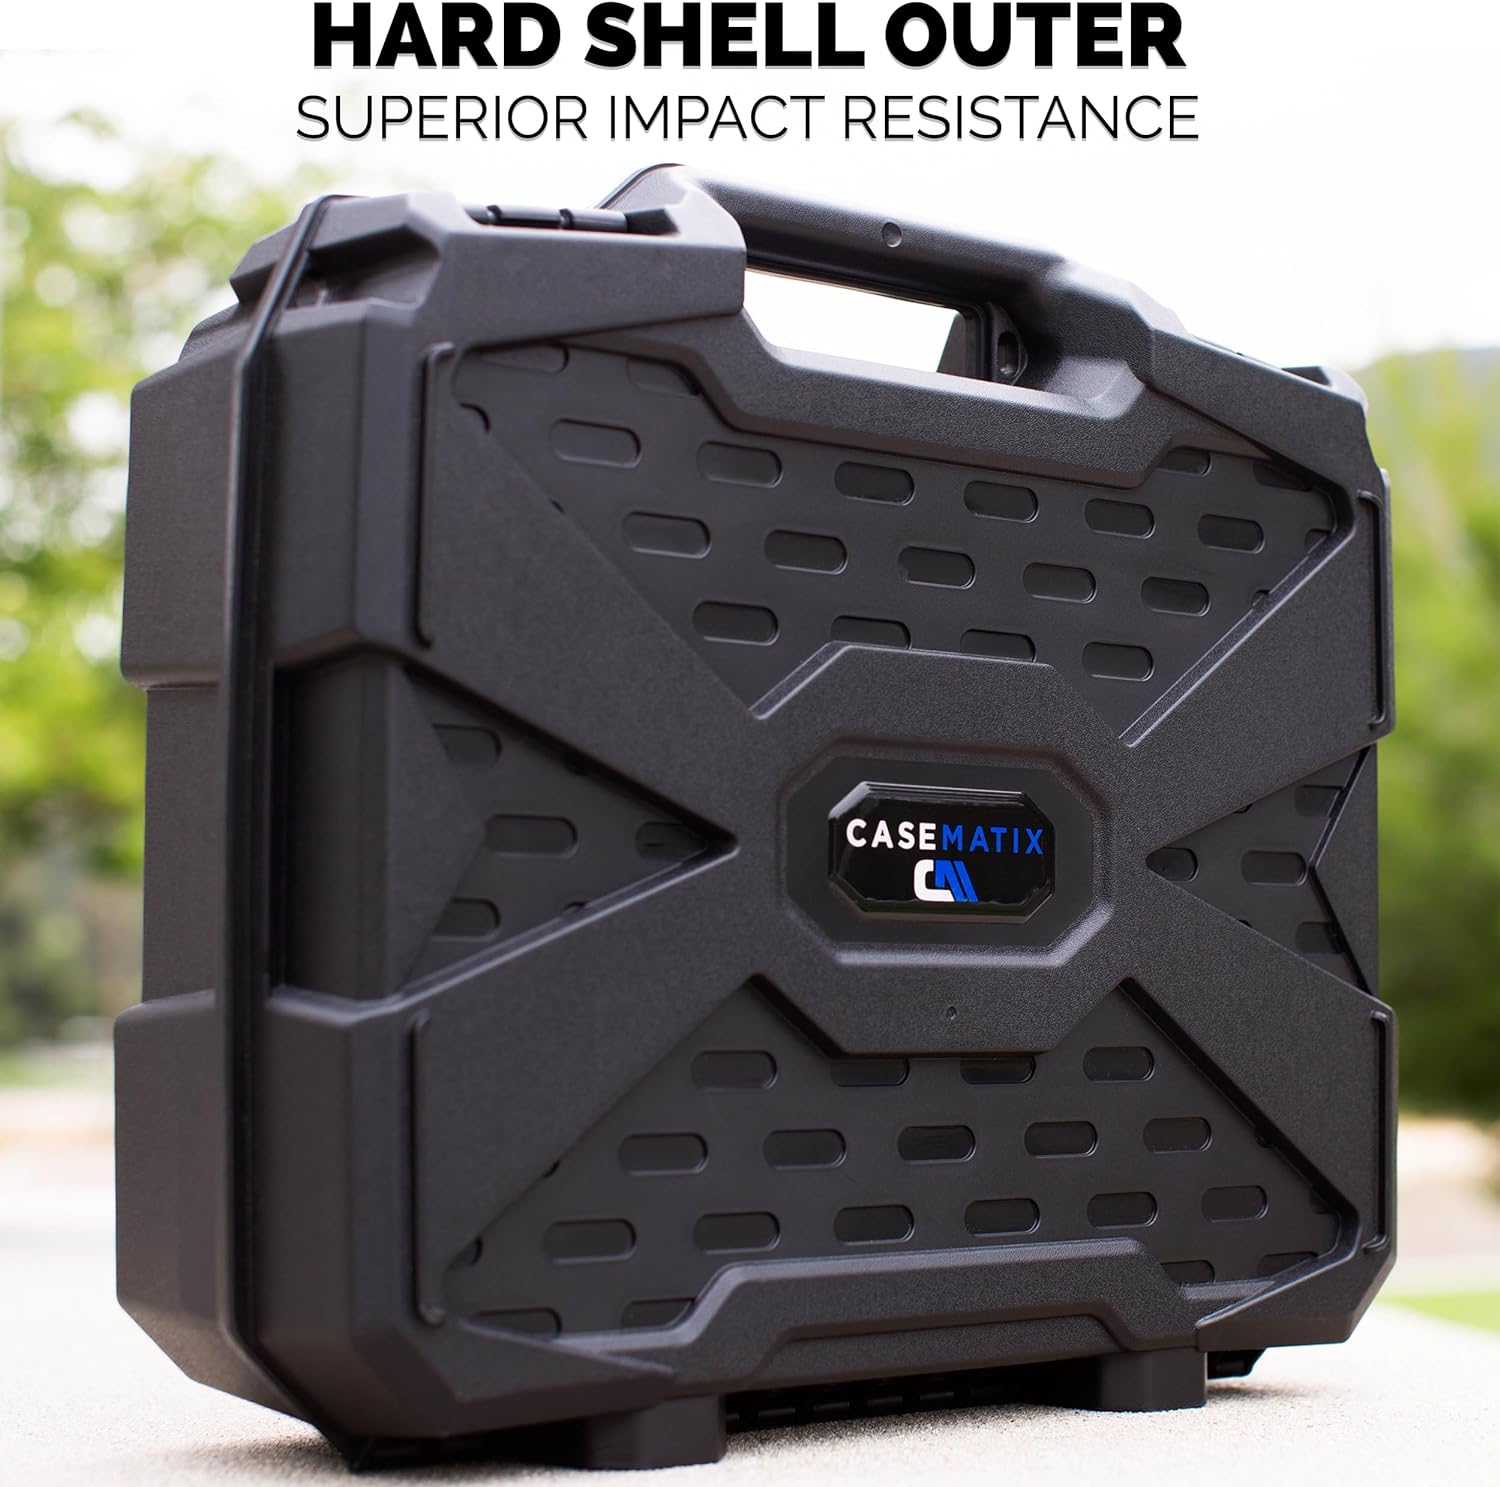
This hard shell case’s exterior is made of a dense, injection composite plastic for superior external protection against blunt forces, drops, and scratches that can damage your All In One VR headset. Interior protection consists of a Tri-Layer arrangement with a padded foam top, foam bottom and customizable pull and tear cubed foam middle.
Safely Travel With VR Headset and Keep Accessories Organized
This case is easy to transport using its convenient carrying handle. Measuring 16″ x 13″ x 6″ in exterior dimensions, this case is perfect for securing and protecting your VR Headset while traveling. Keep all your VR accessories organized and in one place.
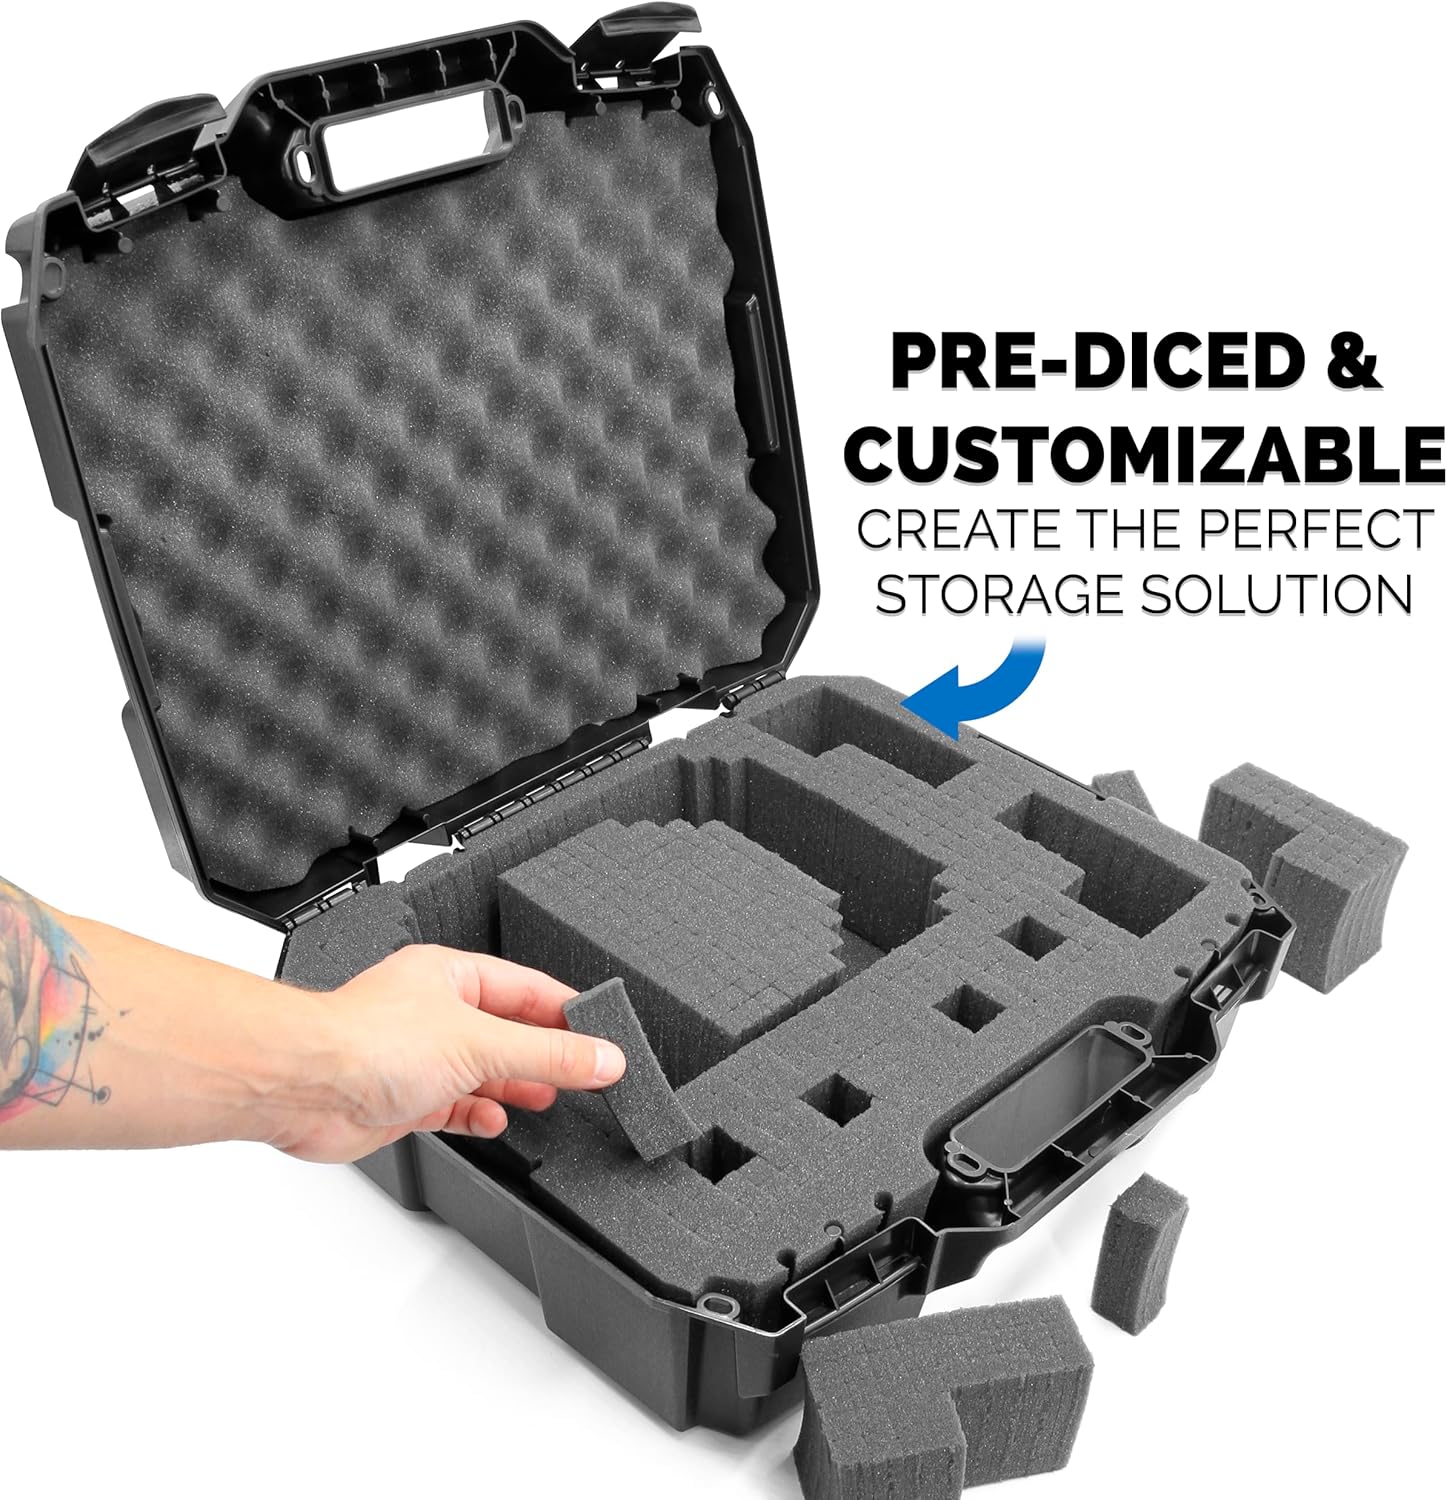
Customizable Diced Foam Foam Interior to Protect from Impacts and Create Custom Compartments for your Virtual Reality Headset, Controllers and Charger
The middle layer of this case has an area that is customizable within 14” (length) by 10.75” (width) with a maximum depth of 4 inches. It is up to you to pull the foam cubes and create compartments in the orientation desired. Depending on how you store your VR Headset determines the amount of space you have for accessories. The thick padded foam will keep the VR all in one headset separated from controllers and provide impact protection from all angles.
Product Dimensions : 40.64 x 35.56 x 15.24 cm; 1.36 kg
Date First Available : 20 May 2019
Manufacturer : CASEMATIX
ASIN : B07S59ZSMN
Item model number : TAC17-OCQT
[COMPATIBLE WITH META QUEST, QUEST 2, QUEST 3, QUEST 3S VR HEADSETS]: This VR headset case features a hard shell exterior and customizable foam for your headset, controllers, cables, headphones and other accessories!
[KEEP EVERYTHING FOR YOUR VR HEADSET ORGANIZED]: The CASEMATIX Customizable VR Headset carrying case keeps your headset and accessories organized – Compatible with Meta Quest, Meta Quest 2, Meta Quest 3 & Meta Quest 3S.
[COMFORTABLE CARRYING HANDLE]: Our VR Headset Hard Case makes it easy to transport your headset and accessories with a reinforced and comfortable carrying handle, offering security and comfort all-in-one!
[HARD SHELL EXTERIOR & SOFT DICED FOAM INTERIOR]: Create custom compartments for your virtual reality headset and accessories – Interior measures 14” x 10.75” x 4” & Exterior measures 16″ x 13″ x 6″
[MADE IN THE USA]: This case’s middle foam layer has an area that is customizable within 14” (length) by 10.75” (width) with a maximum depth of 4 inches. It is up to you to pull the foam cubes and create compartments in the orientation desired.
6 reviews for CASEMATIX Hard Case Compatible with Oculus Quest 2 and Oculus Quest VR Gaming Headset & Accessories – Oculus Quest Case Storage with Customizable Foam Also fits Elite Strap and Other Accessories
Add a review
Related Products


£80.14
Paul Roberts –
Great Case!
Great case, I didn’t use the recommended setup for the Oculus with battery strap as I found the buttons on the hand controllers faced down on one of the controllers when using this setup, which could result in your batteries being drained, so I used my own setup that keeps the hand controller buttons free from being accidentally engaged.The only thing that would be nice would be to have this configuration in a permanent moulding rather than the tear-off pieces, but that’s a wish list, not a product fault. That said, If you sold one for this case, I would buy it, as over time, the tear-off pieces tend to break off! But it’s a fantastic case and much better than anything I have tried before!
Daniel A. –
Vale la pena para proteger distinta clase de equipos contra golpes. Obviamente no resistira caidas de 10 metros, sin embargo protege para golpes comunes, caidas pequeñas, etc.
Micheal Z. –
First off…. its an awesome case!!! Second.. I’m very upset because I specifically orded this because it said it fit the elite strap. Well…as you can see in my pic, it stays open 4 inches!!! Meaning I have to force close the lid that far. Not cool!!! Especially when you advertise it for this after market accessory. Unfortunately the foam insert is custom fit to the curvature of the case. I turned it around, so the gap was smaller, but it was harder to close,.. from the high point of my oculus to the locking clips as it’s closer now. Either way…. its being forced shut. The case should be deeper for this accessory.
Steve W –
I’m not really here to review the CaseMatix product itself as much as to offer my experiences and assistance to the community of users / customers. The product seems fine and sturdy and will serve its job well. Seems a little high priced to me, but also seems pretty good quality and should do its job well if you cut the foam properly. That was my first surprise (and not immediately obvious to me) that you have to design it yourself for whatever your use. That’s a good thing, because you can use it for a lot of purposes and use it the way you see fit. But it’s also more work to have to try to decide the best configuration. It gave me pause, because most of the ad photos show the product finished after someone has cut out the squares.NOTE: I’ll try to attach media to this post in the order mentioned in the post. No promises, though! :-)MY LAYOUT DESIGN AND TEMPLATE FOR THE OCULUS QUEST 2 (default head strap)So I looked at the photos that other customers submitted for the way they designed the foam for the Oculus equipment (thanks for those submissions, everyone!). Then I embarked on designing my own.I tried to design mine with extra cushion (2 squares) towards what would be the bottom of the case when it is closed and standing upright. I also didn’t want any of the main pieces touching each other and clanking together, and at least 2 squares between almost all of the pieces. I also wanted the pieces to be snug, so they just fit in there and hold in place well. The heavy end of the headpiece is towards the bottom of the case so that when the case is closed and upright, it will not exert extra pressure on headband / earpieces / any other pieces. As you can see, there is also a special section of loose foam (green section in my grid template) to attempt to protect the lenses and keep the headband tamed. The headband excess is folded back and forth gently in its designed foam pocket, leaving extra room for other features in the case. Finally, with some remaining space near the handle of the case, I’m using 2 squares the length of the case for chargers, cords, etc.I found that the foam squares in my CaseMatix case are 28 across by 21 down. Since I had to go through the design work for myself, anyway, I was inspired to freely offer the blueprint for this design here so that others could use it if they felt it would meet their needs and did not want to take the time to design their own (see photos to make this determination if you are interested). To do that, I obtained a grid and colored it in accordingly (see photos). I also included a blank grid (see photos) in case anyone else wants to document their particular design for others to use similarly. I hope this is helpful to someone! :-)TIP FOR SEEING FOAM SQUARE EDGESI also found that it was difficult to keep track of where the edges of the squares were in normal light (for grid transfer, counting squares, precision separating, etc). (Maybe this is my eyes? or maybe I’m not using enough light?). So I offer this tip you can kind of see the square edges when light is above or around you (see photos), but you can really easily see the square edges when you lay a light source (like flashlight) down on the foam and shine it across the surface of the foam (see photos)!SEPARATING THE SQUARESI initially missed the small, single-sided “foam customization guide” included the the case because of the advertisey-looking “follow us” message on the opposite side. So I made the mistake of trying to cut my first section out with a knife. That is not necessary, though, as the squares are connected to each other in such a way that you can pull them apart with your fingers. Once you pull them apart, they are permanently separated, unless you tried to glue them back in or order a new foam replacement. If you pull them apart, there seems to be much less (maybe even none) loose foam fragments than if you try to cut them out. After I discovered the “foam customization guide”, it says you can “press down firmly on the blocks of foam you wish to remove and they will separate from the surrounding blocks” however, when I tried this, I was concerned that this method might weaken the connection of the surrounding blocks I wanted to keep in place. So instead I found that separating each block connection one at a time was better. I’m going to try to submit a movie demonstrating this technique (see attached movie). It allowed me to precisely sever only the connections that I wanted to without compromising surrounding connections: You insert your finger on the connection you want to sever (in between two squares), and alternate (wiggle) the tip of your finger back and forth against the two foam blocks you are trying to separate as you press your finger all the way down to the bottom of the blocks.OTHER IDEAS:I am experimenting (see photos) with storing (and attempting to protect) the long and expensive Oculus Link cable under the main foam, so that I can bring it with me and not have to pack it separately and hopefully not have to worry about it getting any kinks / sharp bends in it.I also experimented (not pictured here) with trying to fit my dedicated wireless router in the package (but mine is a little too tall with antennas that cannot be removed), and the chargers and a Chromecast device. The router was really the only thing that didn’t fit because it was too tall. So the good news is that there’s additional room you can experiment with in this design.Finally, I had another, generic idea to share about the CaseMatix case: This might be especially helpful if you only use it for transporting? You could purchase more foam inserts, and switch them out, depending on what you want to store / transport in it. I haven’t checked how much the new foam inserts cost, though, to know if it is very cost effective or not. Information about this is available on the insert called “foam customization guide” (at the CaseMatix website, apparently).Dont forget to register at their website for your free lifetime warranty! (as mentioned on the “advertisey-looking ‘follow us’ message” insert).
Dale Schmidt –
I went out on limb and purchased this to protect my Super Nintendo. The fact that you can fully customize this means it will protect anything you put in there. I believe the removable sections are 1/2″ squares, so it’s easiest to place what you want to keep in there and trace the silhouette with a marker and remove the appropriate squares. Its fully customizable layout makes it convenient to store the unit, patch cords, and both paddles. It works great and is a very clean option to prevent dust and damage to your item. This was a great cost-effective way to protect my childhood gaming console. it’s holds everything I need to play the SNES and will hold the items in place with protective barrier. I loved it so much, that I bought ANOTHER one just so my N64 now has a home, not just collecting dust on a shelf!In Sum: Great modular storage system for anything you want protected. 10/10!!!
Extreamteamcuu –
Es un excelente producto la verdad muy contento con mi compra bastante amplio y fácil de transportar lo uso para mi equipo de multimediaCabe la mezcladora micrófonos inalambricos una laptop y una tablet además de otras pequeñas cosas